Documentation -> Tutorials -> Deploying Websocket support with OpenSIPS and OverSIP
This page has been visited 45450 times.
1. Introduction
The purpose of this tutorial is to show how to easily add WebRTC functionalities to any existing OpenSIPS deployment.
The solution below requires no changes at all on the OpenSIPS side ( because it relies on a WebSocket to SIP gateway ), thus it can be easily integrated with 0 side-effects to your existing deployment.
Secondly, the solution uses entirely open source components ( both for the server and the client side ) - which gives you great flexibility on the server side, as well as on the client side - since you can easily integrate the client into your existing client portals.
2. Platform Components
- We will be using OpenSIPS as the core part of the platform, handling all the SIP traffic. For a basic tutorial of setting up OpenSIPS see the getting started tutorial
- OverSIP will be used as a WebSocket to SIP gateway - all the websocket traffic will reach OverSIP, which will decapsulate the SIP traffic and relay it to the OpenSIPS proxy. OverSIP packages are available for Debian based systems and detailed installation instructions are available for other operating systems as well - see OverSIP deployment tutorial here
- For the SIP client for testing purposes, we will be using sipML5 . It can be downloaded from here and installation is very straight-forward : just copy the sources to your /var/www/ folder. The client's media stack relies on WebRTC and the client can be used to connect to any SIP or IMS network from your preferred browser to make and receive audio/video calls and instant messages. Furthermore, sipML5 should work on any web browser supporting WebRTC but we highly recommend using Google Chrome or Firefox Nightly for testing.
3. OpenSIPS Configuration
OpenSIPS will have to be configured with NAT support. If you do not have NAT support in your OpenSIPS script, or if you want to generate a brand new script, you should use the menuconfig tool and generate a new Residential type script, with NAT support enabled. For more information on generating scripts see this manual page
Here you will find attached a very basic OpenSIPS Residential script with NAT support that should work very well for our scenario.
4. OverSIP Configuration
OverSIP has two basic configuration files that will need to changed in order to achieve our desired functionality :
oversip.conf ( by default located in /etc/oversip/oversip.conf ) contains the Main Configuration part of the server ( no routing logic here - just configuration parameters ).
The parameters that are of interest for our configuration would be :
- sip: section
- listen_ipv4 - IP address where OverSIP will listen on SIP traffic. This will be the IP with which OverSIP will communicate with OpenSIPS on UDP and/or TCP
- listen_port - we should be editing the listen port in case the default port conflicts with other applications on the server. This will be the port on which OverSIP will communicate with OpenSIPS on UDP and/or TCP
- websocket: section
- sip_ws: yes - should be enabled
- listen_ipv4: - IP address where OverSIP will be listening for requests for Websocket clients ( should be a public IP address here )
- listen_port: - we should be editing the websocket listen port in case the default port conflicts with other applications on the server
server.rb ( by default located in /etc/oversip/server.rb ) contains the actual routing logic for the OverSIP server - written in Ruby. The default server.rb script is suitable for the purpose of WS to SIP gateway, so you shouldn't do any changes to it, with one single exception :
- If you are using a pre 1.3.8 OverSIP version, you need to edit the file and add request.fix_nat right after the def (OverSIP::SipEvents).on_request request line - basically we're forcing OverSIP to consider all requests as NAT-ed ( since we'll be using it only for Websocket clients, and they are considered NATed by default due to browser considerations )
Here you will find attached an oversip.conf file that works well with our scenario. The config file assumes that OverSIP will listen on 192.168.2.13
5. sipML5 Configuration
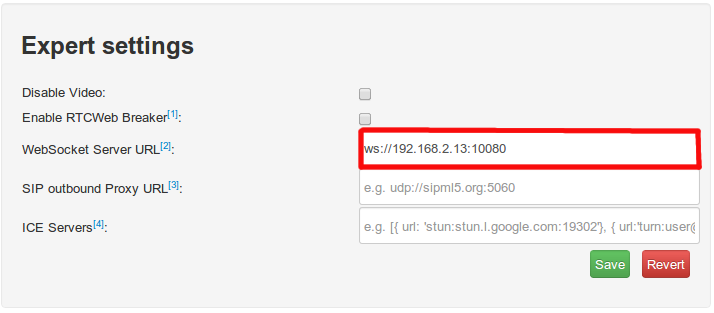
Deploy the sipML5 client on your web server, and access it in your browser. Go to expert mode and edit the WebSocket Server URL to match the OverSIP IP address and port that you entered in the websocket section of the oversip.conf file. Hit save and then return to the first page of the sipML5 client.
Then simply insert your OpenSIPS username credentials and hit login. You should then be able to call other users registered on a webRTC capable SIP client.
Assuming that we have an account on our OpenSIPS box with the opensips-domain.com domain, and that our OverSIP is listening on IP 192.168.2.13 port 10080 for WebSocket traffic, here are two screenshots that show the proper configuration of sipML5 for the SIP user configuration and for the WebSocket server configuration ( accessible from the expert mode options of sipML5 )
Because sipML5 is fully open-source, the configuration of the WebSocket Server URL can be hard-coded into the client, and the actual SIP client can be easily embedded into an existing web interface.